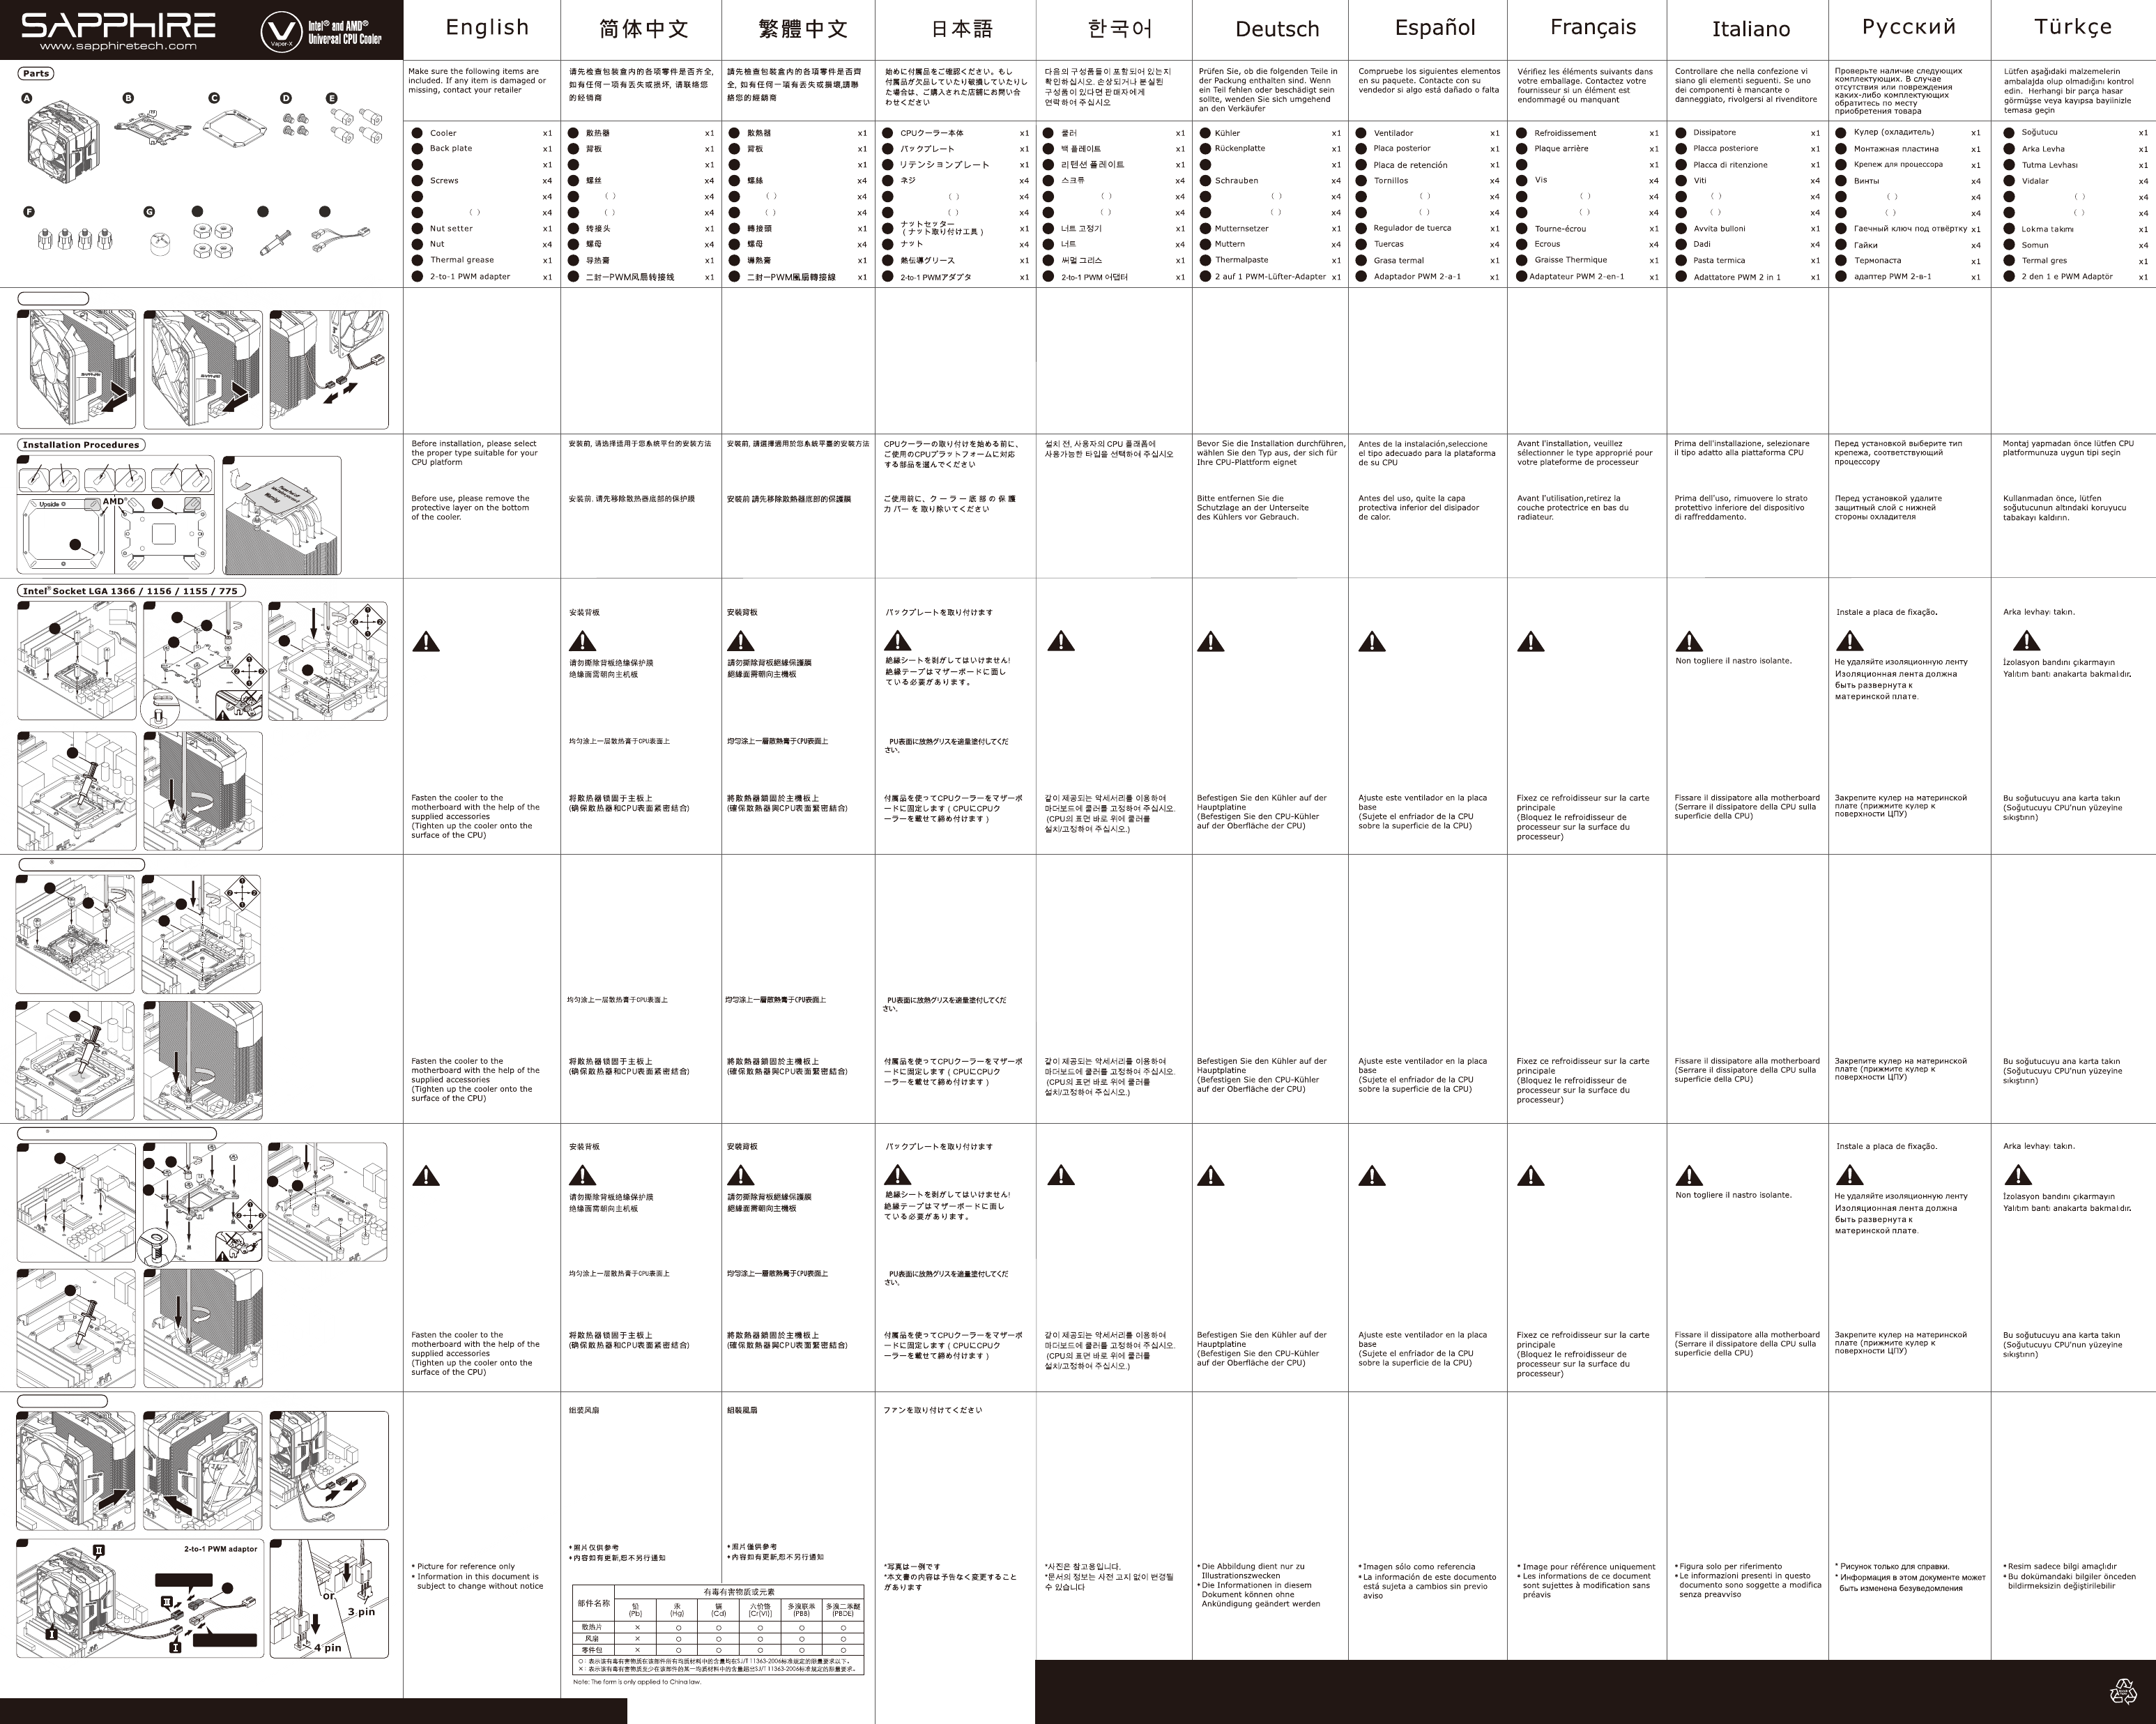
5
A
B
C
D
E
F
G
H
I
J
A
B
C
D
E
F
G
H
I
J
A
B
C
D
E
F
G
H
I
J
A
B
C
D
E
F
G
H
I
J
A
B
C
D
E
F
G
H
I
J
A
B
C
D
E
F
G
H
I
J
A
B
C
D
E
F
G
H
I
J
A
B
C
D
E
F
G
H
I
J
A
B
C
D
E
F
G
H
I
J
A
B
C
D
E
F
G
H
I
J
A
B
C
D
E
F
G
H
I
J
3
螺柱
H
I J
(1)
(2) Intel LGA 2011 only
Intel Socket LGA 2011
Fan Installation
Remove Fan
1
4
2
H
1
1
4
2
5
2
H
G
D
C
B
E
Montagehalterung Plaque de retenueRetention Plate
Stand-off
(1)
Stand-off
2
Stand-off 1
Stand-off 2
Abstandhalter 1
Abstandhalter 2
Sujeciones 1
Sujeciones 2
Entretoises 1
Entretoises 2
Viti 1
Viti 2
1
螺柱
脚座
1
螺柱
腳座
1
スタンドオフ
2
スタンドオフ
22
螺柱
1
2
5
1
1
2
E
B
B
C
Don't pe l off the insulating
tape.
The insulating tape must face
the motherboard.
e
Install the back plate.
Entfernen Sie nicht das
Isolierband.
Das Isolierband muss zum
Motherboard zeigen.
Installieren Sie die Rückplatte.
No quite la cinta aislante.
La cinta aislante debe mirar
hacia la placa base.
Instalar la placa trasera.
Ne retirez pas le ruban isolant.
La bande isolante doit être mise
faceàla carte principale.
Installer la plaque arrière Installare la piastra posteriore.
Il nastro isolante deve essere
rivolto verso la motherboard.
Wenn das Lüfterkabel an den
3-poligen Anschluss der
Systemplatine angeschlossen wird,
funktioniert die PWM nicht
Schließen Sie das Netzkabel an Conecte el cable de alimentación Connecter le câble d’alimentation Collegare il cavo di alimentazione
Si conecta el cable del ventilador al
conector de 3 contactos de la placa
base, la función PWM no funcionará
Si vous connectez le câble du
ventilateur à un connecteur 3
broches de la carte principale, la
fonction PWM ne fonctionnera pas
Se si collega il cavo della ventola al
connettore a 3 pin della mainboard,
la funzione PWM non sarà attiva
If you connect the fan cable to
3-pin connector on the mainboard,
the PWM function will not work
Connect the power cable
当您将风扇插于主板的3-pin接头时,
PWM功能将无法使用
连接电源线
當您將風扇插於主機板的3-pin接頭時,
PWM功能將無法使用
連接電源線
메인보드에 위치한 3-핀 커넥터에 팬
케이블을 연결할 경우, PWM 기능은
동작하지 않습니다
파워 케이블 연결하기
백 플레이트를 설치하여 주십시오.
절연 테이프를 벗겨내지 말아 주십시오.
절연 테이프는 마더보드와 마주 보고
서로 맞닿아 있어야만 합니다.
백 플레이트를 설치하여 주십시오.
절연 테이프를 벗겨내지 말아 주십시오.
절연 테이프는 마더보드와 마주 보고
서로 맞닿아 있어야만 합니다.
,
쿨러 바닥면에 부착되어 있는 보호
커버를 제거하여 주십시오.
Fasten the stand-off to the
motherboard
将螺柱锁固于主板上 將螺柱鎖固於主機板上
マザーボードにスペーサーを固定して
ください
스탠드 오프를 마더보드에 고정시키십
시오
Befestigung des Abstandhalters am
Motherboard
Asegure las sujeciones a la placa
madre
Fixez les entretoises à la carte-mère Fissaggio del contrappeso alla
scheda madre
ファンの電源ケーブルをマザーボー
ドの3ピンコネクタに接続した場合
にはPWM制御は行えません
ケーブルの4PINのコネクターをM/B
に絵のように繋いでください
G
Fan Installation L fterinstallation Instalación del ventilador Installation du ventilateur
팬 설치
Installazione della ventola
F
C
D
G
3
Apply a thin layer of thermal grease
onto the surface of the installed CPU.
Tragen Sie eine dünne Schicht
Thermalpaste auf die installierte CPU
auf.
Aplique una capa fina de grasa
térmica sobre la superficie de la CPU
instalada.
Appliquez une fine couche de graisse
thermique sur la surface du CPU
installé.
Applicare uno strato sottile di grasso
termico sulla superficie della CPU
installata.
설치된 CPU 표면 위에 써멀 그리스를
얇게 발라 주십시오.
C
2
4
3
4
LGA 775 LGA 1156/1155 LGA 2011/1366
3
I
J
Стойки 1
Стойки 2
Uzaklaştırma 1
Uzaklaştırma 2
Присоедините шнур питания
Если подсоединить провод
вентилятора к 3-контактному
разъему на материнской плате, то
функция управления с помощью
широтно-импульсной модуляции
(PWM)работать не будет
Güç kablosunu bağlayın
Установите стойки на материнскую
плату
Uzaklaştırma vidalarını ana karta takın
Fan kablosunu ana karttaki 3 pimli
konnektöre takarsan z, PWM
fonksiyonu çal maz
ı
ış
Установка вентилятора
Fan Montajı
Нанесите тонкий слой
термопасты на поверхность
установленного Графический
адаптер
İnce bir tabaka termal gresi
takılan CPU'nun yüzeyine
uygulayın.
Нанесите тонкий слой
термопасты на поверхность
установленного Графический
адаптер
İnce bir tabaka termal gresi
takılan CPU'nun yüzeyine
uygulayın.
Нанесите тонкий слой
термопасты на поверхность
установленного Графический
адаптер
İnce bir tabaka termal gresi
takılan CPU'nun yüzeyine
uygulayın.
C
D
I
I
3
In no event shall SAPPHIRE be liable for any special, indirect, incidental or consequential damages arising from any defect or error in this manual or product.
©Copyright 2012 SAPPHIRE Technology Ltd. This manual is copyrighted with all rights reserved. No portion of this
manual may be copied or reproduced by any means. While every precaution has been taken in the preparation of
this manual, no responsibility for errors or omissions is assumed. Neither is any liability assumed for damages
resulting from the use of the information contained herein.
© 2012 Advanced Micro Devices, Inc., AMD, and the AMD Arrow logo, Radeon, and combinations thereof are trademarks of
Advanced Micro Devices, Inc. INTEL, Core I7,I5,I3, Z77, and/or registered trademark of Intel Corporation Inc. All other company
and/or brand/product names are trademarks and/or registered trademarks of their respective owners.
AMD Socket FM1 / FM2 / AM3+ / AM2
Black to black
Brown to brown
 Manymanuals.com
 Manymanuals.de
 Manymanuals.fr
 Manymanuals.it
 Manymanuals.pl
 Manymanuals.cz
 Manymanuals.es
 Manymanuals-pt.com
Comments to this Manuals